Shadowrocket Setup Guide:
Import Subscriptions, Connect & Verify
Complete the initial setup in five steps. First, connect to an existing server, then check the rules. If a problem occurs, return to the earliest step that failed; do not change several settings at once.
Screenshots are official App Store images for identifying screens and fields. The layout may change with app updates; refer to the English interface labels shown on your device.
01 Add a server or import a subscription
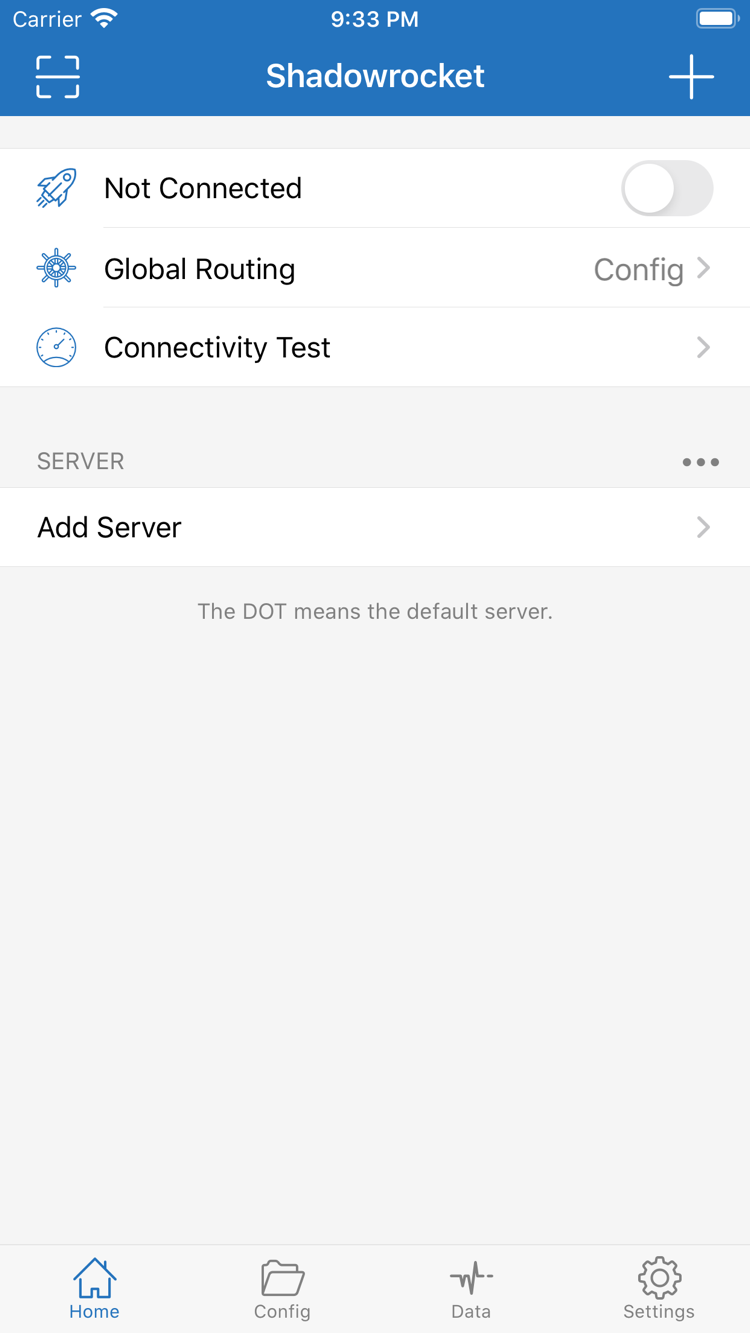
Start from Home. Find Add Server near the SERVER section, or use the add control on the page. Choose one import method: use Subscribe if you have a complete subscription URL; enter the details manually if you have a single server's protocol, address, port, and authentication information; use Scan QR Code if you have your own config QR code. Do not combine different types of information in the same field.
Import an existing subscription with Subscribe
- Get the complete subscription URL from your service provider. When copying it, keep the path, query parameters, and trailing characters intact. Do not copy only the domain or include surrounding instructions.
- Open Add Server and select Subscribe under Type. Paste the URL into the URL field, enter a name to help you identify it if needed, and save.
- Return to Home and wait for the subscription to load. Confirm that the subscription group or server entries appear, then select one. If the group name appears but no server can be selected, check the subscription result before trying to connect.
Subscription URLs often contain access credentials, so treat them like passwords. Do not include the complete URL in public screenshots, article comments, or troubleshooting records. Updating a subscription reloads remote content. If an update fails, keep the existing entry, check whether the URL is still valid and accessible from your current network, then decide whether to import it again. Repeatedly adding the same URL can create duplicate entries and will not fix an error from the remote service.
Enter server details manually with Add Server
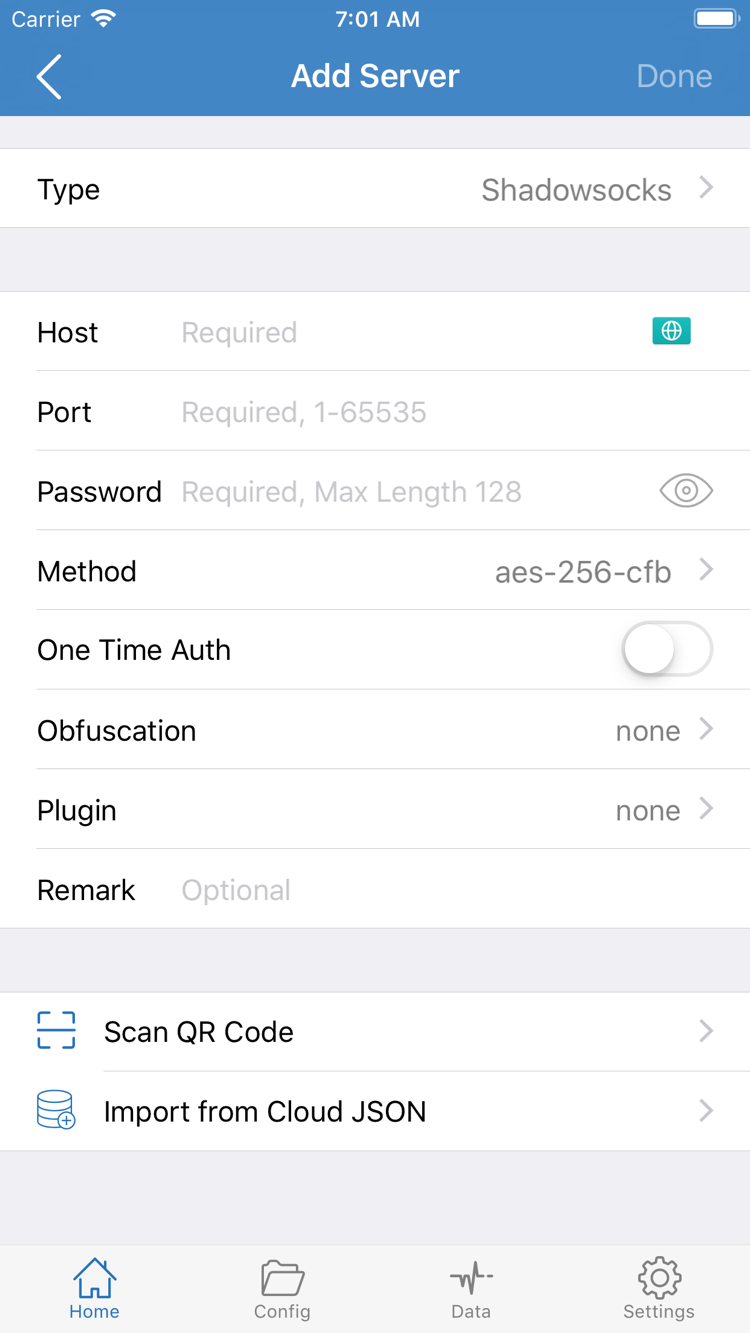
When adding a server manually, set Type first, then fill in the fields required by that protocol. The screenshot shows a form with Host / Port / Password / Method; other protocols may have different options. Enter the server address from your service details in Host and the corresponding port in Port. Do not enter a subscription URL with a path in Host. Password, Method, and other authentication parameters must match the server settings. Do not guess based on field names or replace a setting just because an option looks common.
If you have a QR code, choose Scan QR Code in Add Server and allow camera access when prompted. After scanning, check Type and the address. Import from Cloud JSON is for the corresponding data format; it is not a substitute for an ordinary subscription URL. After saving, return to Home and confirm the new entry is present and selectable. Then choose Global Routing.
02 Choose Global Routing
After adding an entry, return to Home and open Global Routing. This setting determines how requests choose a route; it is separate from the server you select. Before your first test, decide what you need to verify and choose a mode accordingly. The three modes are Config / Proxy / Direct. Do not assume that turning on the connection switch means traffic is using the proxy.
| Mode | How it works and when to use it |
|---|---|
| Config | Matches requests against the selected config file's rules. Suitable for everyday use that requires distinguishing between PROXY and DIRECT. |
| Proxy | Routes requests through the selected proxy. Useful for an initial check that the server works; this is not the same as testing website-specific rules. |
| Direct | Routes requests directly and can help check whether the basic network connection works. Do not use it to test the server's proxy performance. |
How Config files relate to Config mode
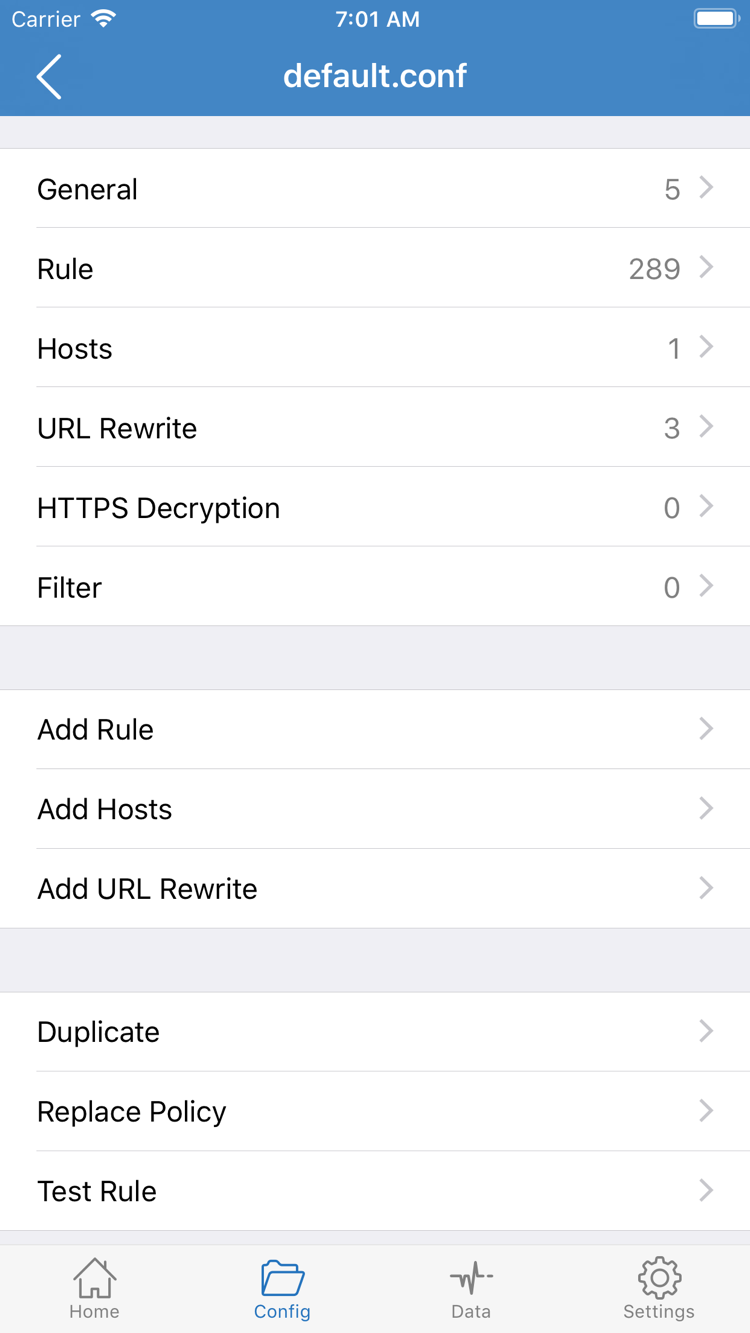
Config mode on Home chooses to process requests according to a config file. The Config tab at the bottom is where config files are managed. Open Config and confirm that the intended file is selected. When you open a file, you may see sections such as General / Rule / Hosts / URL Rewrite / HTTPS Decryption. For a first connection, check that the file comes from a trusted source and that the Rule policies are clear. You do not need to enable other features one by one just to establish a basic connection.
Rules are matched in order. An earlier match can affect the route used by a request; FINAL provides a fallback when no earlier rule matches. The following example illustrates rule order and is not a complete config to replace an existing file. It sends example.com and its subdomains to PROXY and routes other requests through DIRECT. Save a copy before modifying a real file, and do not apply the example to your own business domains in bulk without checking them.
[Rule]
DOMAIN-SUFFIX,example.com,PROXY
FINAL,DIRECT
If you are unsure whether the existing rules are correct, first use Proxy mode to test the selected server. Once the server works, return to Config to verify routing. If Proxy works but Config does not behave as expected, check the selected file, rule order, and target policy before re-entering the server password. For rule details, see DOMAIN-SUFFIX and FINAL rules for specific websites. For App Store access and account issues, see the App Store guide.
03 Select an entry and connect
Return to Home and select the server you want to use in the SERVER list. Check that the selection indicator is next to the intended entry. A subscription group name is only a management label; it does not mean an individual entry is selected. Check Global Routing again. If you switched to Direct for comparison, switch back to Proxy or Config for this test. Otherwise, turning on the connection switch will not test the intended proxy route.
- Tap the connection switch at the top of Home. Before a connection is established, the page may show Not Connected. After turning it on, check whether the status changes.
- On first use, the system may ask to add a VPN configuration. Review the prompt, confirm that you initiated the action in Shadowrocket, allow the configuration to be added, and complete device authentication as prompted.
- Return to Shadowrocket and confirm that the switch remains on and the status does not immediately revert to disconnected. Then continue to the actual test. If the switch turns off automatically, resolve the system authorization or configuration issue first.
The system VPN authorization establishes the network processing channel required by the client; it does not provide missing subscription or server details. A changed connection status only indicates that the channel status changed. It does not prove that the remote server, DNS, or destination websites are all working. Do not rely only on the VPN icon in the system status bar; run a test and open an actual page as well.
If another VPN configuration is active on the device, stop that connection first to avoid competing for the system network channel. Managed devices may restrict adding VPN configurations; if this happens, check the device management policy instead of repeatedly deleting all network settings. On Demand is not required for the first connection. Keeping the switch manual makes it easier to see how each action changes the status.
04 Verify the connection and routing
After connecting, run Connectivity Test on Home and check the result for the current test method. Then open a browser and visit a website you actually need to use. A successful test means the tested route responded using the current method; it does not mean every protocol and website is available. A failed test does not necessarily mean the authentication parameters are wrong. The test target may be temporarily unreachable, the test method may affect the result, or the basic network may have a problem.
Check server availability separately from rule behavior
- Check the basic network first: Temporarily disconnect and confirm that the device can access everyday websites. If it cannot, check Wi-Fi, cellular connectivity, or a network sign-in page.
- Then check the server: Select an entry with verified parameters, connect in Proxy mode, and visit a destination expected to be reachable through that server. If it fails, record the specific symptom before changing any rules.
- Finally, check routing: Switch back to Config and visit one destination expected to use PROXY and another expected to use DIRECT. If the current interface provides request or connection records, compare the destination domain, matched rule, and policy.
A single webpage may load resources from multiple domains. If the home page opens but images or sign-in fail, different resources may be using different rules. Adding a rule for the main domain alone does not necessarily resolve the issue. Browser cache and existing connections may also preserve old results. After changing rules, make a new request; if necessary, close and reopen the page rather than treating a cached page as evidence of a new connection.
To check network usage, open Data and review the available statistics. A change in traffic does not prove that a particular request matched PROXY. For verification, record four details together: the current server, Global Routing mode, test destination, and actual result. Once you have checked all four, you can consider automatic connection or more detailed routing rules. The initial setup is complete here; no further settings are needed yet.
05 Settings and common issues
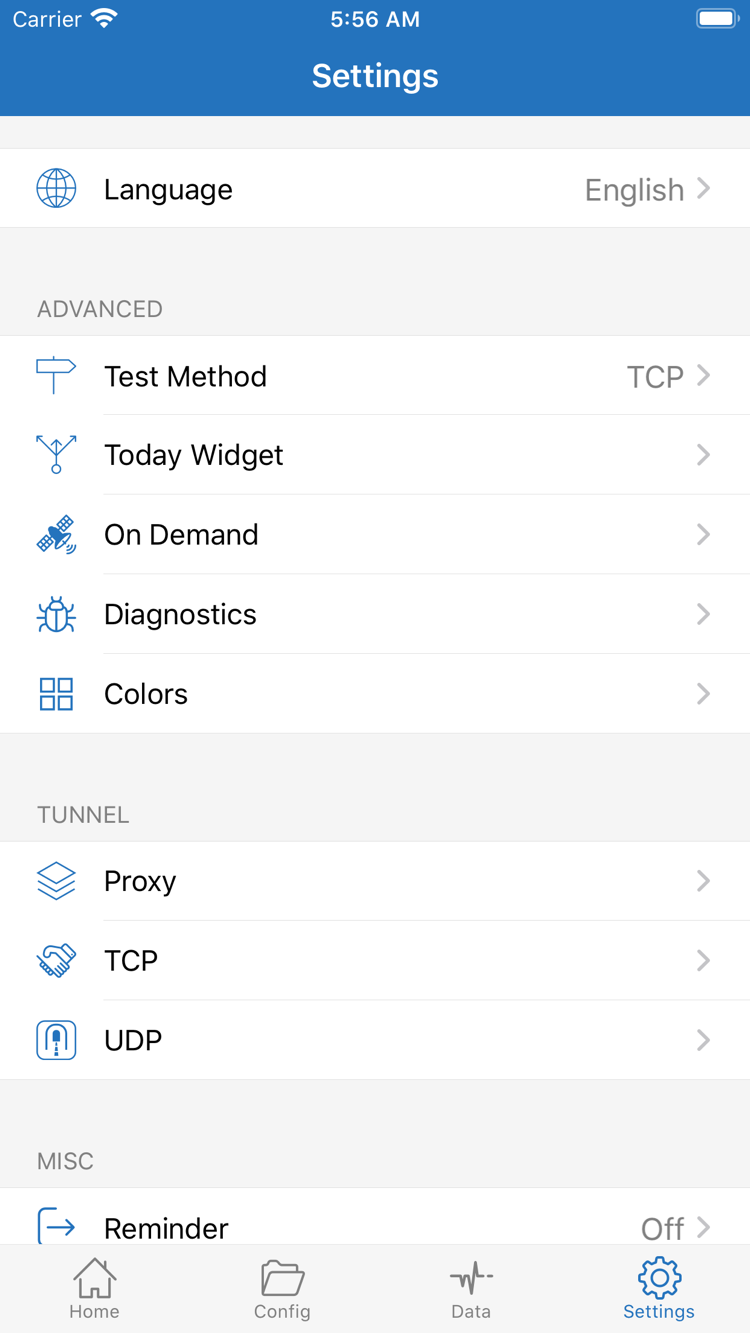
Start troubleshooting at the earliest stage where the problem occurs: if import fails, check the subscription; if an entry is saved but the test fails, check the server; if the switch will not stay on, check system authorization; if Proxy works but Config does not, check the rules. In Settings, you may see items such as Test Method / On Demand / Diagnostics / Proxy / TCP / UDP. Do not switch every option just in case it helps.
Subscription will not load or the list is empty
Check that the Subscribe URL is complete, especially the parameters after the question mark and any spaces or line breaks introduced when copying. Confirm that you entered a subscription URL, not a web console address. If the subscription returns no content, authentication fails, or the format is unsupported, saving it repeatedly usually will not help. Ask your service provider to verify that the address is valid, the access conditions are met, and the content format is supported. Keep the error text for troubleshooting, and hide the URL, account details, and authentication fields before sharing a screenshot.
An entry is present, but Connectivity Test fails
First confirm which entry is selected on Home, then check Type, Host, Port, and the authentication fields required by that protocol. In Settings, check Test Method and understand which test method is currently in use. Different methods test different targets and capabilities; failure with one method does not mean every request will fail. If you have another entry known to work, compare them without changing other settings. If you do not have a comparison entry, verify the original parameters rather than guessing another port or encryption method.
The switch turns off, or the connection starts again after disconnecting
If the switch will not stay on, check whether the system VPN configuration request was completed, whether another VPN connection is active, and whether device management policies apply. If the connection starts again after disconnecting, check whether On Demand in Settings matches your expectations. Temporarily turn off automatic connection conditions, test connecting and disconnecting manually, then configure On Demand if needed. It does not fix invalid server details.
Connected, but a website or some features do not work
Compare the results in Proxy and Config modes. If only Config has a problem, check the selected file, Rule order, and FINAL. If both modes fail, check whether the issue is related to the destination site, DNS, server capabilities, or protocol parameters. Seeing TCP or UDP in Settings does not mean you need to change them. Check the corresponding transport and settings only after confirming that the affected feature uses them.
Keep diagnostic records that can be reviewed
For further diagnosis, use the relevant feature in Diagnostics and record the stage where the failure occurs, network type, current mode, and steps that reproduce the issue. Repeat step four after each change. Revert changes that do not help so you know which settings are still reliable. Before sharing any records, check for server addresses, passwords, subscription parameters, and personal browsing details, and hide sensitive information as needed. For config file sections, see .conf structure explained. Do not overwrite the entire config just to troubleshoot.